Controling an electronmagnet
There are a number of tutorials on how to make an electromagnet. The simplest way is to get something iron or steel and wrap an insulated wire around it a lot. The strength is dependent on how much current goes through the wire and how many wraps you do. If you get magnet wire like I used, it is covered with a clear insulator. To make the ends of the wire conductive, you must either sand off or burn off (with a lighter) the insulation. If you plan to run the magnet for a long time, I recommend using a thicker or longer steel core to act as a hint sink as the magnets can heat up a lot. An alternative (if your project allows it) is to fire your magnets in pulses. That will give your magnets a chance to cool down some. The image shows the electromagnets I used for my haptic device.
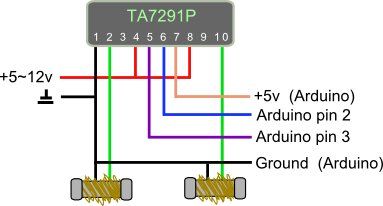
The circuit is very simple. All you need is the same circuit for powering a DC motor. However if you don’t need to reverse the polarity of the magnet, you can hook up two magnets to every motor bridge. I recommend hooking this up to an AC adapter rather than batteries as it will go through your batteries quickly (and may overheat them). Don’t power the magnets with your Arduino or you’ll fry the board. To hook an AC adapter to a breadboard, just clip the connector plug off, strip the wires, and wrap or solder them to some solid core wire. If you don’t have a voltmeter, if one wire of the adapter has dashed lines, that’s most likely the positive.
Code:
The Arduino code to run this is simple--it really only takes the sample blinker program that is in examples section in your Arduino compiler. Plug the wire leading to pin 3 into a ground slot instead and run this:
void setup() {
  pinMode(2, OUTPUT);
}

void loop() {
  digitalWrite(2, HIGH);
  delay(500);
  digitalWrite(2, LOW);
  delay(1000);
}
The above program will only control one magnet though. The two motor bridge inputs should be HIGH/LOW or LOW/HIGH to control one of the magnets. LOW/LOW is of course off. Here is a blinker program that alternates between the two magnets.
void setup() {
  pinMode(2, OUTPUT);
  pinMode(3, OUTPUT);
}

void loop() {
  digitalWrite(2, LOW);
  digitalWrite(3, HIGH);
  delay(500);
  digitalWrite(2, HIGH);
  digitalWrite(3, LOW);
  delay(500);
  digitalWrite(2, LOW);
  digitalWrite(3, LOW);
  delay(500);
}